
Beeswax
How to Make Beeswax at Home
Nov
Table of Contents
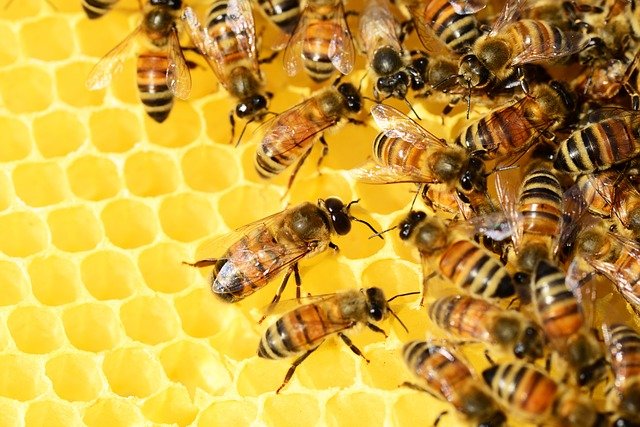
BEESWAX, as we all know it, are made from raw honeycomb that also came from the hard work of worker bees. The very first thing that needs to be done is to look for a raw honeycomb to start the process with. Without it, literally, we won’t have any beeswax made. If you’re lucky enough, you can chance upon an abandoned beehive—thus a safe way to procure one.
How do you make beeswax?
The process on how to make your beeswax at home can be quite easy, all you need to stock up on is patience – and honeycomb. Here’s to start it off:
- Cut it into smaller pieces. It is best to break the honeycomb into smaller pieces and gradually put them all in into a large pot (look for one that you no longer use to cook food in). The good thing about making your own beeswax is – it doesn’t matter whether you got an old comb or one that has been infested with molds, it is absolutely usable.
- Put water into the pot. Fill the pot with water ¾ all the way. Just about enough to submerge the honeycomb all in. Once the pot is already on the stovetop, slowly heat it and make sure it does not boil, keeping it into a simmer. Just putting it out here that the process can be very messy.
- Bring it to a simmer. Just keep it the way it is, making sure it does not boil, until all the honeycomb has melted into a soupy state. Once it reaches into a soupy state, turn the heat off.
- Remove the messy stuff. Use a strainer that you no longer use to prepare food with as stain may stay for quite some time. Remove the messy particles and let the liquid drip into another container.
- Bring the liquid into a simmer again. Pour the liquid back into the pot and heat it until it gets into a good simmer once again. Keep at it until the greasy matter can be seen floating on top. Strain the floating greasy matter out into an empty container.
- Let it sit. Once the liquid cools down, the water and the pure beeswax will separate, leaving a glorious golden disk of beeswax that we can easily scoop out. Don’t let your excitement get you, you must wait until it cools down completely before you remove it from the bucket.
- Lo and Behold! You now have your homemade beeswax. This can now be used in so many ways. Enjoy!
How does one render beeswax from a Honeycomb?
Step 1. Cheesecloth. Wrap the comb into a cheesecloth. There are those who would consider using processed combs and those who uses the natural ones, but with both, it is best to use a cheesecloth to deal with little particles. This way saves you so much time clearing the melted liquid and the combs all in the cheesecloth already.
Step 2. Boil. Once the water is brought to a nice simmer, put in the honeycomb packed in a cheesecloth into the boiling water. At first, it may still be hard, but us the process goes, it becomes easier to deal with since it becomes softer and softer. Look after the water level, as it boils away, water may also evaporate, we don’t want that to happen. Keep adding more water into the pot until the comb can easily be squeezed out.
Step 3. Rendering. Once the wax is completely rendered, and you can no longer squeeze out any wax out from the cheesecloth, pour the wax water into empty containers. Wait for it to solidify until it cools down completely. You may notice that the wax looks a bit dirty and that it still needs further cleaning.
Step 4. Clean. Remove the wax disc from the dirty water and melt the wax all over again with the use of a double boiler. This way, any solids or dirt will fall the bottom once again. Use a filter that you no longer use to serve food with as wax can be difficult to clean it after. Once you take notice that the wax is clean enough to pass your standard, pour it into molds or containers.
How to make white beeswax?
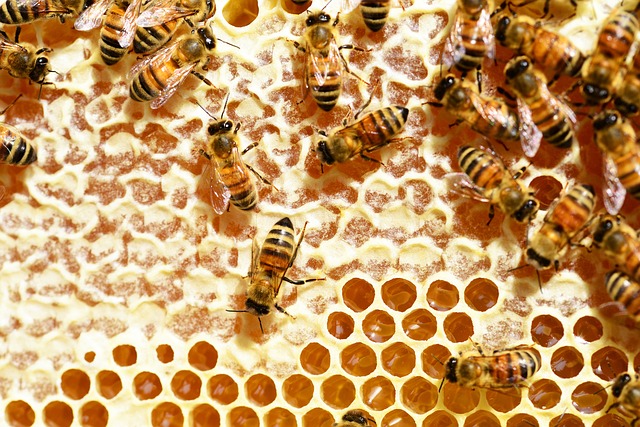
Originally, the beeswax comes out in a creamy white color once it squeezed out by the wax glands of the bees. Staining the wax into a golden hue, the worker bees are able to bring in nectar and pollen all into the hive. From what is generated into a beeswax, filtration is the key to bring the beeswax back to white.
A number of ways can be done for this process. A more common practice especially for bigger companies is the use of bleach or filtration using chemicals. When you take notice of the color of candles and it’s a bright white or very white, these are chemically filtered ones, or the use of bleach is practiced. Now, to achieve the ivory white color, the beeswax goes into filtration for 5 times with the use of natural cloths. Some include using a family’s trade secret, powdered to absorb the pollens from the wax.
How to render beeswax using a crockpot?
- Use an old crockpot that you no longer use for food preparations. It is better to use an older crockpot since the wax can be a pain when you clean it out. It can be thoroughly cleaned, but it may take time. It is better to choose one that is no longer used for any kind of food preparation.
- Make sure that the honeycomb is cut into smaller pieces. Always a must to cut the comb into smaller pieces as it is easier to handle it and easier to break down when it’s already in smaller pieces.
- Wait for the wax to completely melt down. Fortunately, with the use of a crockpot, you can keep the temperature very low and not worry about the beeswax being burnt or so, unlike using a double boiler where you have to be attentive to the process, making sure not to burn the wax in the process.
- Stir it gently. While waiting for it to fully melt, gradually stir it, gently, to toggle parts that may not have start melting. Keep in mind that stirring too much is also discouraged. By stirring the wax, you’re also blending the dirty grease you want to take out from the wax water. Once the comb is completely melted, turn the heat off.
- Let it sit. Allow the wax some time to cool down. Once it does, it will completely harden and might form cracks on its own. Once it’s completely cooled down. Break the disc that’s formed. Take notice how the wax cools down. All the dirty grease are underneath. If it can be helped, scrape away the dirty grease, leaving the chunks of wax behind.
- Reheat the wax. Put the wax back into a cleaner crockpot (after you removed the cooled-down wax, make sure to clean the crockpot.) Turn the heat on once again and wait until the wax has been completely melted.
- Strain the wax away. Consider using a strainer you no longer use for food preparation. While it’s still within its liquid state, pour the liquid onto a strainer and make sure that there’s an empty container underneath the strainer to store the wax away. Check the liquid wax if there are still dirty particles that you may want to strain out. If needed, repeat #6 and #7 until you take out all the dirty grease.
- Once the liquid no longer shows dirty grease, pour it into mold. Once you’ve filtered out the dirty grease from the liquid wax, you may want to use paper cups as molds as it is easy to peel it off without damaging the product. After which, there you have it, a completely rendered beeswax out from the crockpot.
How to render beeswax in the oven?
Step 1. Make sure that you rinse your leftover comb completely.
Step 2. As much as possible, strain the comb completely. We have to take off as much water as we can.
Step 3. Dry off the wax by placing it on a paper towel lined screen.
Step 4. Fill the baking dish with water and keep it ¼” deep. After, put the screen above a baking dish.
Step 5. The baking dish should be placed over on an old baking sheet. Again, if possible, use tools that no longer is of use as cleaning this afterwards requires a lot of hard work.
Step 6. Carefully heat the oven for over 250 degrees.
Step 7. If the wax you’re currently working on is completely melted, gradually add wax if there are any more available.
Step 8. When all the wax has melted away, allow the wax to cool off. It should turn yellow and may also harden. Once it does, remove it from the oven. There you have it now, this is one of the best ways on how to make your own beeswax.
How to render or clean beeswax using cheesecloth?
Using a cheesecloth is a guaranteed cleaner way to make one. Here’s what you all need to do:
- The safer way to render the beeswax is using cheesecloth. Choose the fine cheesecloth, this way, we can keep the utensils right away. Securely wrap the comb inside the belly. Use a thicker one. Admittedly, this method spells order. You’ll learn why in a few.
- Place the cheesecloth-wrapped bowl of nails and submerge it into the water. After turn the stove on and wait for it to boil.
- Put the beeswax in a pot and let it simmer. Turn the heat off when all the chunks has melted away. Wait until most of the beeswax has completely cooled down and that dirty things have floated off.
- You may melt it again, making sure that once everything liquifies, you strain it well so that all the dirty junks will no longer be included.
- Best to pour the remaining wax into a paper cup or any mold you desire to use to store the wax.
There we go, a list of the best ways on how to make beeswax at home. Save a lot— just get yourself an abandoned honeycomb to start with.
Aussiebeeswax
Latest posts by Aussiebeeswax (see all)
- Embracing Organic Living: Why It Matters in Our Modern World - March 26, 2024
- 5 Tips To Keep Your Kitchen Organised - October 23, 2023
- 8 Tips to take care of your leather furniture - January 24, 2023